
What is the Google Merchant Center and How can I Create my First Product Data Feed?
If you haven’t heard of it, the Merchant Center allows you to upload your products and make them available for sale via the Google Shopping channel.

If you run an eCommerce store online, there’s a good chance you have heard of the Google Merchant Center. If you haven’t heard of it, the Merchant Center allows you to upload your products and make them available for sale via the Google Shopping channel.
Why Should I Care about the Google Merchant Center?
For starters, when you create a product feed in the merchant center, you get access to people that are using the Google.com/shopping platform to find products. However there is another benefit that I think is even more important, once you have created your data feed and been approved, you also have an opportunity for your product to show up in Google.com search queries. Here’s an example to show you what I mean, take a look at the screenshot below:

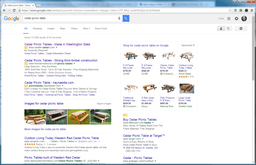
Seattle-Cedar.com is a site owned and managed by Ambaum. We have a regular AdWords search campaign and you will see that result showing up in spot #1. Also you can see that there are number of listings over to the right with product images. These images show up very commonly when you do a search for a particular product. You can also see that Seattle-Cedar.com has an entry there up in the top right – that result is showing because that product was included in our Google Merchant Center data feed.
What is a Product Data Feed?
Setting up your first feed in the Google Merchant Center can be a bit intimidating if you have never worked with a data feed previously. However if you dumb things down a bit (which I love to do), then you realize that a data feed is just a way to present your product data in a simple format. There are many ways you can create your product feed:
- .txt (text file)
- .csv (tab delimited file)
- .xml (XML feed)
- .gz (compressed text or XML)
- .zip (compressed text or XML)
- .bz2 (compressed text or XML)
For the purposes of this blog post we are going to walk through the creation of a product feed with Excel and saving the file as a .CSV (tab delimited). You can setup your feed to automatically be fetched from you’re your website via XML or via a JSON API, that would require programming work to setup, send us an email if you want to learn more about how to automate your product feed.
How to Create Your First Product Data Feed for the Google Merchant Center
Google recommends using a spreadsheet program such as Microsoft Excel or Google Sheets to create your CSV file, I will be using Excel in our example below. There are a number of fields that are mandatory for your data feed and even more that are optional. For the complete instructions on how to create your product feed, here is the Google Merchant Center help link.
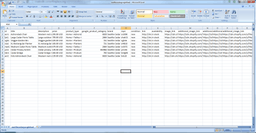
I created a CSV file with a sample of 8 products (the rows in the image below). I used the following fields in my CSV file (the column headers)
- id
- title
- description
- price
- product_type
- google_product_type
- brand
- mpn
- condition
- link
- availability
- image_link
- additional_image_link (optional)
- additional_image_link (optional)
- additional_image_link (optional)
- additional_image_link (optional)
You will need all of these fields for your product feed to be approved by Google with a couple important exceptions:
- I added 4 additional images, you can see those files showing up in the columns titled: “additional_image_link”, these are optional images I wanted to include for each product.
- I did not include tax information in my product feed, I created a master record of my tax information and loaded it into my account under: “Settings”, then click on “Tax”. There is a separate guide to uploading your tax settings, review that here.

Here is more information about each of the mandatory fields:
- Id – I created my own custom id for each project and tracked it in a separate spreadsheet I use for pricing.
- Title – a simple, yet descriptive name for each product.
- Description – I kept this to 2 or 3 sentences and focused on the products + our staining process.
- Price – very specific formatting requirement, it must be like this: 299.00 USD
- Product_Type – I think of this as the breadcrumbs or product hierarchy. It was easy for me to create this since we already created our site w/ this concept, here is an example: Home > Products > Bridge
- Google_Product_Category – Google has created a taxonomy for all physical products, here is a link to their categories (I used “ctrl + f” to search for my products).
- Brand – very easy for us the name of our company: Seattle Cedar
- MPN – finding the manufacturer’s product number took a bit of digging, but was easy when I looked back our order forms.
- Condition – new, all of the items we sell are brand new to the customer
- Link – URL of the product page where the item can be purchased
- Image_Link – URL of the primary product image
- Additional_Image_Link – additional images for each product
Once you load up your product data feed, you will receive an error report. The first time I did it, left off my Brand and MPN and tax information and had to re-upload the file. After I fixed the issues and re-uploaded the file I received a message that all 8 products were added successfully. I thought I would be off and running, but then you have to wait to get your products reviewed by a live Google employee. I uploaded my final feed on a Thursday and on Sunday my first product was reviewed. It then took all day Monday for the final products to be reviewed, so make sure you leave enough time for Google to do their review of all your products, especially if you have a large data feed and are doing this for the first time.
